Tuesday, September 29, 2015

Hyperion Planning Basics

It has been a long time I am planning to learn Hyperion Planning. But as a typical technical person, could not do it until I started working on Hyperion Planning project for one of the clients.
To summarize my understanding, I will be updating my blog with Planning knowledge step by step.

This very first article is about Hyperion Planning Basics.

What is Planning

Oracle Hyperion Planning is defined as a Web-based planning, budgeting, and forecasting software.
The process of preparing for the future is planning. Planning is the set of activities to achieve goal in preparing the future.

Planning Types

As a part of planning, generally, an organization has two types of plans:
·         Strategic planning: A strategic plan includes the goals and objectives of an organization. It looks into its current business and aims by setting goals of what it wants to be in future. It includes a comprehensive strategic plan of how to achieve and it is at a very high level of an organization.
·         Operational planning: This is a set of detailed guidelines or a detailed plan to be executed to achieve the strategic plan. This planning involves the granular details of setting the responsibilities of people, departments and divisions. Hence, it's rightly called 'operational'.

What is Budgetting

Budgeting in an organization is planning how to spend money or how to allocate money to different departments or divisions.
Therefore, we can say that budgeting is a part of planning and without budgeting the planning cannot be successful in achieving the organizational or strategic goal.

What is Forecasting

Forecast is to predict the future. We make few assumptions about the future, which is called forecasting.
Conclusively, forecasting acts as a prerequisite to planning and budgeting is a part of planning activity. These three activities are intertwined but yet they are different.

Budgtting software – Oracle’s Hyperion Planning

Many organizations use Spreadsheets for budgeting. But Excel has some disadvantages like time taken, data integrity, cost, scalability and adaptability.
Oracle Hyperion Planning is defined by Oracle as a centralized, Web-based planning, budgeting, and forecasting solution that drives collaborative, integrated, event-based planning processes throughout the enterprise.

Planning Architecture


When we want to go for implementing Oracle’s Hyperion Planning solution, we need to purchase Planning software from Oracle. It is available in 3 packages.

Oracle Planning Product Architecture

Broadly, Planning Product Architecture is divided into three layers, shown as follows:

  1. Client Layer – End users connect via a web browser or Microsoft Office
  2. Web layer – the web layer provides the web content to end users
  3. Application layer – the application layer contains all of the intelligence and performs all of the processing
  4. Database layer – the database layer stores the data, metadata, web components, etc.
    DB layer has two kinds of DB – RDBMS and Oracle Essbase

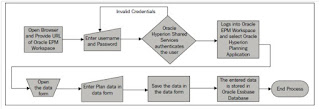
Oracle Hyperion Planning Process Flow


Depending upon the operation performed in the Planning application, the information is stored or retrieved from a Relational source such as metadata or security information and/or from Oracle Essbase as shown in the following image:

Oracle Hyperion Planning Solution Architecture

Oracle Hyperion Planning solution includes following additional products
·         Oracle Data Integrator (ODI)
·         Financial Data Quality Management (FDQM)
·         Oracle Business Intelligence (OBI)
·         Hyperion Web Analysis
·         Hyperion Financial Reporting

EPM


Thursday, July 30, 2015

Extracting Data file from HFM application

Here comes the situation.
I set up a new DEV environment for HFM. After installation and configuration was done, I was required to get current application in DEV.
First, application profile is created via HFM desktop client. Please refer following article to create application profile.
http://evolvewithhyperion.blogspot.in/2015/07/creating-application-profile-for-hfm.html

Then, through workspace, HFM application is created.

After we create an application, we load application elements like metadata, member lists, rules, and security files. 
Now, we can load multiple files and then the system loads files in proper sequence.

But if we are loading individual application elements, we need to load them in proper sequence given below:
1) Security
2) Metadata
3) Member Lists
4) Rules

There are many different ways to load application elements but here we are loading using extract and load tasks from workspace.


  • Application security
In workspace, open application.
Administration --> Extract tasks --> Extract Security.

Save the security file at required location.
Load security to new application from load tasks.


  • Application Metadata
1.
From Extract Tasks, select Extract Metadata.


2.
In the Delimiter Character text box, enter the character to be used i.e. “;” – semicolon  to separate the metadata in the file.


3.
Select the Financial Management Application Format checkbox to extract the file in APP format. Clear the Financial Management Application Format checkbox to extract the file in XML format.


4.
Select the types of metadata to extract and click Extract.


5.
In the Download Instructions, click the Click here to download link.


6.
Click Save.


7.
Browse to your backup location. In the "Save as type" list, select All Files and click Save.
8.
Navigate to your backup location and verify that the APP extract file was saved and provide this extract file with app extension.


Wednesday, July 29, 2015

Creating Application profile for HFM application

1.      Application profile introduction

Application profile is like base of application in Hyperion Financial Management.
Before creating any application, we need to create application profile file (.per) and then we can use this file to create any number of applications.
Following 4 dimensions are defined in Application profile. We can not change these dimensions further for application.
·         Period
·         Year
·         View
·         Custom

Application profile can be created only through desktop HFM client in all versions.

In v11.1.2.3, Desktop HFM client has only one functionality of creating application profile and managing metadata. All other functions like creating application, loading data, metadata etc are performed through web client.

2.      Profile creation

Open desktop HFM client and login using credentials.

 From left side menu à Application à Define application profile

 Create a New Application Profile

On the second screen, specify languages used in application. We are using English language in our application.


On the third screen, specify Period and Year dimensions.

On the fourth screen, frequencies of periods are mentioned.

On the fifth screen, our selection for dimensions View, Year, Peroid is displayed.
On the last screen, profile is saved at required location.

This profile file is saved and used while creating HFM application.
Same profile file can be used to create any number of HFM applications.

Tuesday, January 13, 2015

Migrating artifacts using Hyperion LCM

1.      Overview

Lifecycle Mangement: Lifecycle Management provides a consistent way to migrate an application, a repository, or individual artifacts across product environments and operating systems.We can migrate application artifacts using Shared Services Console or Lifecycle Management Utility.

Migrating Scenarios:

1. When the source and destination appicaltions are registered with the different instance of Shared Services, i.e. when source and destination servers are on different environments,ex: you are migrating applications from Dev to Test, Test to Prod etc.

2. When the source and destination applications are registered with the same instance of Shared Services, Ex: Copy an application within an environment.

2.      Artifacts


Application Artifacts by Module

Module
Artifacts
Shared Services
User and Group Provisioning 
Projects/Application Metadata
Essbase
Files (.csc, .rpt, .otl, .rul)
Data
Filters
Partitions
Index and Page files (drive letters)
Application and Database properties
Security
EAS/Business Rules
Rules
Locations
Sequences
Projects
Security
Hyperion Planning
Forms
Dimensions
Application Properties
Security
Hyperion Financial Management
Metadata
Data
Journals
Forms/Grids
Rules
Lists
Security
Financial Data Quality Management
Maps
Security
Data
Metadata
Scripts
Security
Reporting and Analysis (Workspace)
Reports
Files
Database Connections
Security


3.      Procedure

Lets Migrate the App1 Planning Application from one environment to other: 

3.1.     Select source application and artifacts to be migrated

Log into Shared services, under Application Groups select the application which you want to migrate, once done select the artifacts,

 When you click on define migration it will take you to the migration wizard, Confirm source application to be migrated.

3.2.     Migrate source artifacts to Source File system

Because I want to migrate my application to a different environment I need to take a file system back up of the App1 Application, there is no need to give the location, it will automatically be stored at the pre defined location(we can set this location as well, more in detail later). The default location is: Oracle\Middleware\user_projects\epmsystem1\import_export\<userName>@Native Directory\


 You can save the migration definition file for future use, and click on Define Migration,
 You can click on Launch Migration Status Report to check the status of the migration, it will take you to the following window,
 Migration will take some time and this time depends on the size of the application, you can click on the refresh button to refresh the status of migration. After you see the completed status you can find the file system back up under the File System Folder under Application Group Management,
  If you want to have a look at the folder which is created you can check at location specified above, if you are on distributed environment you will find this folder on the Foundation Services' Server

3.3.     Migrate artifacts from source file system to Target file system

Now lets create a folder and copy the file system backup to destination server at the same location, now if we login to shared services again we will find this folder under File System,.
as per our example: Oracle\Middleware\user_projects\epmsystem1\import_export\admin@Native Directory\DevBkup09092011_11_28AM\

3.4.     Migrate artifacts from Destination File System to Destination environment.

Now we need to perform an import on the destination server, this time select DevBackup0909201111_28AM under the file system, and select all artifacts, 
 Now in Migration Wizard this File System backup will be your source and TgtApp1 will be your target application. You need to be very careful when you choose source and destination otherwise this will screw other applications if you chosen anything wrong.
 Once done you can check Migration summary to ensure the complete migration.


Thursday, January 8, 2015

Hyperion Workspace and Shared Services URL without port numbers

When an application is accessible via a network it means that it is using a TCP/IP port. When a port is used by an application, it cannot be used by another one. Even during installation/deployment, we will get an error message stating that a particular port is being used by another application. Therefore, the skill to find out what port is being used by what application comes in very handy.

If you want to find out what is using a specific Port, you can open the COMMAND PROPMT and type in
netstat -aon findstr "6800"

Default port numbers of Hyperion EPM System:
Sr No Name of Service Default Port Number
1 Shared Services 28080
2 Workspace 19000
3 Planning 8300
4 Essbase 13080
5 Essbase Agent 1423
6 HFM 80
7 Weblogic 7001

Recently, I have installed and configured one server environment for Hyperion EPM V11.1.2.1. Shared Services and Workspace URL's were accessible using following two URL's 
http://MyServer:19000/workspace/index.jsp
http://MyServer:28080/interop/index.jsp

But, as per the client's requirement, port numbers were not required while accessing final URL's of Hyperion EPM system.

It is possible if we change default port of accessing URL's to 80. To implement the same, complete following steps:
1- Stop all Oracle/Hyperion services
2- Launch EPM System Configurator
3- Choose to modify existing EPM Oracle Instance
4- On configuration tab, uncheck all actions and only check "configure web server" option found below Hyperion Foundation
5- Choose your web server and specify the new port
6- Keep other selections as defaults and press next
7- Continue until your configuration is completed then press finish
8- Start all Oracle/Hyperion services

Now, my URL's are accessible using following URL's
http://MyServer/workspace/index.jsp
http://MyServer/interop/index.jsp