Friday, January 17, 2014

Active Directory configuration in Hyperion EPM V11.1.2.2

Background

As of now, we are using default directory for authorizing users for Hyperion EPM System in Vodafone.
Default directory is native directory - refers to the Lightweight Directory Access Protocol (LDAP)-enabled user directory that Shared Services uses to support provisioning.

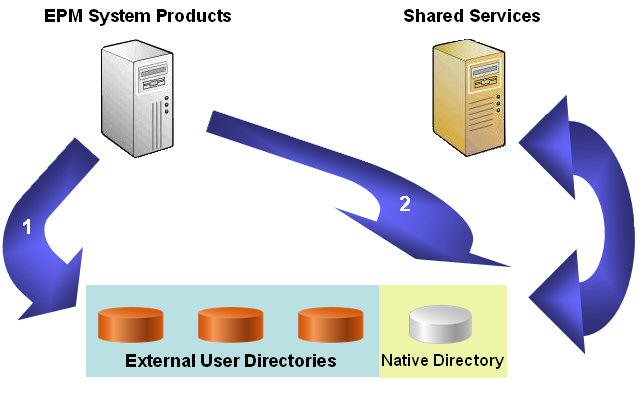
What is User Directory

User directories refer to any corporate user and identity management system compatible with Shared Services.
Supported User directories
·         OID
·         Sun Java System Directory Server (formerly SunONE Directory Server)
·         Microsoft Active Directory
·         custom-built user directories that implement LDAP version 3
·         Windows NT LAN Manager (NTLM)
·         SAP native repository

We can configure one or more user directories along with native directory in shared services for EPM System.
User Directory functions:
·         Used to maintain and manage the default Shared Services user accounts required by EPM System products
·         Central storage for all EPM System provisioning information because it stores the relationships among users, groups, and roles

Single Sign On (SSO) for EPM system using User Directory
·         Through a browser, users access the EPM System product login screen and enter user names and passwords.
·         The Security API implemented on the EPM System product queries the configured user directories (including Native Directory) to verify user credentials. A search order establishes the search sequence. Upon finding a matching user account in a user directory, the search is terminated, and the user's information is returned to the EPM System product.
·         Access is denied if a user account is not found in any user directory.


Configuring MSAD

Open shared services console
Administration à Configure User directory


1.     MSAD Connection information


·         Directory server – populated automatically depending upon the user directory selected for configuration. As we selected, MSAD, Microsoft is populated here.
·         Name – It is for our reference. We can give any name here.
·         DNS Lookup and Host Name
o   DNS Lookup – When HA is implemented, we can use this option.  IF the main MSAD server fails, we can switch to the backup server which is registered to the same DNS name.
o   Host Name – This option is used when HA is not implemented. When user enters credentials in EPM system, the user is searched in MSAD server which is located with the host name given.
As HA is not implemented in our case, we should be using Host Name.
·         Port – User Directory port (389 is for MSAD)
·         Base DN – The distinguished name (DN) of the node where the search for users and groups should begin. Without filling anything, click “Fetch DNs” button and then select one of the listed DNs
·         ID Attribute – This attribute must be a common attribute that exists in user and group objects on the directory server.
The recommended value of this attribute is automatically set for OID orclguid, SunONE (nsuniqueid), IBM Directory Server (Ibm-entryUuid), Novell eDirectory (GUID), and Active Directory (ObjectGUID).
·         Maximum size – it sets the limit on number of maximum users retrieved during search.  We have set this limit as 500 as retrieving all users from domain takes huge time.
·         Trusted – if it is trusted SSO source.
·         Anonymous bind – ignore this right now. (To give search permission to particular users
·         User DN – This is the distinguished name of user that will be used by Shared Services to configure.
To get DN, we can search it in registry after logging into domain with same user credential.


We did not go for advanced options this time and can be covered later.
 2.     MSAD User Configuration


Data entry in this user configuration screen is optional. If we do not enter any user information here, Shared Services searches for all users present in Base DN.
As we think, this will definitely affect the performance. But we are going to manage performance by restricting user search to 500 in first step and then configuring with a particular group instead of the whole base DN.
So, we just kept the user configuration screen blank and moved ahead.

3.     MSAD Group Configuration


The final step is MSAD group configuration.
Here, in the unique identifier box, enter correct name of group in domain and press auto configure. This will populate your group RDN.

In the second box,
Name Attribute – we have filtered user Admin from MSAD directory.  Admin user will be used only from native directory. We were getting following error before trying this option.

2014-01-14 10:50:59,295 ERROR [[ACTIVE] ExecuteThread: '1' for queue: 'weblogic.kernel.Default (self-tuning)'] com.hyperion.css.spi.impl.msad.MSADProvider.authenticate(Unknown Source) -- 60:1005:Authentication failed for user admin. Enter valid credentials.

In the last box, we have limited domain users only to specific group. You can create a particular group for Hyperion users in domain and provide the group name here so that the performance will be good.

Once we finish this step, we need to logoff from Shared Services console.
Then we can see MSAD directory in the directory list in Shared Services Console.

When logged off after MSAD configuration from shared services, I was not able to see the new directory under User directories.
*****************************************************************************
We need to restart foundation services service i.e. HyS9FoundationServices - Hyperion Foundation Services - Managed Server from services.
This showed the new added directory under user directories
******************************************************************************

Wednesday, January 15, 2014

Uninstalling Hyperion EPM V11.1.2.2

All Hyperion folks know it clearly that dealing with Hyperion setup will require knowledge about uninstalling Hyperion suite completely.
As it is pending from a long time, here are basic steps to follow to uninstall Hyperion EPM V11.1.2.2.

Uninstall using same admin credentials with which we have installed Hyperion EPM V11.1.2.2

Uninstall all related softwares

EPM uninstaller uninstalls JRE which comes with EPM installer. It is used for installation and configuration of any Hyperion products. The same JRE is used to uninstall related non-Hyperion softwares like weblogic, OHS. So, if we proceed for EPM V11.1.2.2 uninstall, we can not uninstall related softwares by proper procedure and so we might end up in option of deleting folders and cleaning related stuff.

Thus, it is very important to follow following steps before uninstalling EPM V11.1.2.2.
  1. Run WL Uninstaller seperately
  2. Run OHS Uninstaller separately
  3. Run Oracle Application Developer uninstaller separately
Once we uninstall above products, check if the respective directory is removed from MIDDLEWARE_HOME.

Uninstall EPM System V11.1.2.2

  1. Stop all Hyperion and Oracle services
  2. Uninstall Hyperion EPM system by running "uninstall.bat" located at "MIDDLEWARE_HOME\EPMSystem11R1\uninstall"
  3. Once the uninstall is complete, the directory "MIDDLEWARE_HOME\EPMSystem11R1" should be removed.

Post Uninstallation tasks 

 Shortcuts should be removed.

Check from Start--> All Programs, all related shortcuts should have been removed.

Windows Registry

Check under Windows registry in HKEY_LOCAL_MACHINE > Software and HKEY_CURRENT_USER > Software whether the Brio > Hyperion > Oracle keys have been removed correctly. 
Search registry and remove all the keys with keyword "Hyperion" or "Brio" or "Oracle"
With Oracle keyword, there will be keys for Oracle client which is installed as pre-requisite of EPM System.

Environment Variables

Following environment variables are created while installing hyperion EPM system and should be removed after uninstalling EPM system.
    • ARBORPATH
    • EPM_ORACLE_HOME
    • ESSBASEPATH
    • HYPERION_HOME
To confirm removal of environment variable, first check if the variable is still present.
If the environment variable is still present, delete it as below.

PATH variable

Check the PATH variable and delete any portions that need to be removed.


Manual File Deletion

Manually check the file system to see if any files or folders have been left behind. If any of these are left behind, they need to be removed manually.

  •     Ensure that <system drive>\Documents and Settings\<install_user>\.oracle.instance file has been deleted.
  •     Ensure that .oracle.products file in Middleware_Home\EPMSystem11R1 has been deleted.
  •     Remove any files left in the existing HYPERION_HOME if this location is to be re-used.
  •     Delete any BEA folder on the file system.
  •     Delete or rename installer records in C:\Program Files\common files\InstallShield\* if no other programs installed by this tool remain.
  •     Check for Oracle EPM related entries in the inventory.xml file located in C:\Program Files\Oracle\Inventory\ContentsXML and remove these entries from the file.
  •     Clean up any remaining Hyperion-related files and directories under the user's install home. E.g. "D:\Oracle\Middleware"

Registry keys deletion

Registry keys which should be deleted:

    HKEY_LOCAL_MACHINE\software\wow6432node\oracle\
    Delete any additional 'dds_proxy' settings in the registry.
    Delete any additional 'arborpath' entries in the registry.
    Delete any additional 'hyperion' entries in the registry.

Reboot the system

Please reboot the server after all the steps in the uninstallation have been performed.

Wednesday, January 8, 2014

Hyperion EPM V11.1.2.2 Installation Pre-requisites


Pre Installation Checklist

1.       Work Area
·         Internet Access – Outside firewall (Disable firewall for the working folder – e.g. installers and oracle folder)
·         Computer within EPM Servers network
2.       Third party licenses
·         E.g. web server licenses 
3.       Software
Check all installers are downloaded from oracle edelivery
4.       Required documents
Check if all the required documents are downloaded from oracle edelivery 
5.       Preparing the Hardware
·         Confirm your plan of deployment architecture – whether single server or distributed env for EPM
·         Confirm whether computers meet hardware system requirements. Check following matrix.

·         Prepare each server for installation
·         Resolve Firewall problem
Open a restricted range of ports in your firewalls for client to server or server to server communication.
·         Disable antivirus
Exclude the EPM Oracle home directory from automatic antivirus scans and scan this directory only at scheduled times.

Preparing Environment

Preparing Ports

This section contains information about default port numbers for EPM System products.
EPM Module
Default Port Number
Default SSL Port
Weblogic Administration Server
7001

Websphere
9043

IBM HTTP Server and IIS
80

Oracle Enterprise Manager Web Application
7001

Foundation Services Web Application
28080
28043
Oracle HTTP Server


IIS
80
443
Provider services (SmartView)
13080
13083
Essbase Administration Services
10080
10083
Reporting and Analysis Framework Web Application
45000
45043
Financial Reporting Web Application
8200
8243
Web Analysis Web Application
16000
16043
If required, necessary ports should be enabled on EPM Environment servers. Firewall should be disabled at these ports for communication between servers or between servers and clients.

Installing a Database Client

If you are using Oracle Database, install the full database client and test the database client with the TNSPing command. The details of DB client installation are given in section Preparing the database.

Disabling User Access Control (Windows 2008)

In Windows 2008 environments, disable User Access Control (UAC) on each server in the deployment.
Control Panel à System and Security
 

Setting default authentication level (Windows 2008)

For machines hosting products that require .NET Framework 3.5, the DCOM default authentication level should be set to Connect

Control PanelàSystem and SecurityàAdministrative Toolsà Component ServicesàMy computer àproperties


Synchronizing clocks

The clock on each server must be synchronized to within one second difference. To accomplish this, point each server to the same network time server.

Resolving Host Names

The canonical host name of each server must be the same when accessed from within the server and from other servers in the deployment.
You can modify hosts file located at following location
C:\Windows\System32\drivers\etc
 epmsys_hostname.bat
An archive of the utility (epmsys_hostname.zip) is available in the directory where you unzip
the assembly for EPM System Installer.

Disabling Anti-virus Software

Antivirus software can cause performance issues with EPM System products if, each time you access any resource on the server, the antivirus software tries to open and scan the object. To prevent these issues, exclude the EPM Oracle home directory from automatic antivirus scans and scan this directory only at scheduled times.

E.g. – In our Vodafone single server env, we are using Symantec antivirus software which needs to be disabled as below

Excluding the EPM Oracle home directory from automatic antivirus scans 
Scan EPM Oracle home directory only at scheduled times.   

Preparing User Accounts

·         Do not use the Administrator user to install and configure. Run EPM System Installer and EPM System Configurator as a user with administrator rights.
·         When you upgrade, apply a maintenance release, or patch this server, use the same user account that was used to install and configure the earlier release.


Preparing Database

Before installing EPM System, install supporting database (RDBMS)
·         IBM DB2
·         Oracle
·         MS SQL

The version of DB should match the version of operating system.

Oracle Database

Install the full Oracle Database client on the following machines before you start your installation of EPM System products:
·         Performance Management Architect Dimension server
·         Financial Management application server
·         FDM Application Server and any machine that has FDM Workbench
·         Strategic Finance


For v11.1.2.2 installation, we need to install DB client. Following are some bullet points to be highlighted.
·         We need to install Oracle DB client (Both 32 bit and 64 bit) on HFM and FDM server if we are using distributed environment.
Reason – HFM is 32 bit application and for running all processes properly, we need both 32 as well as 64 bit DB client.
·         For Foundation server, we can install only 64 bit client. 32 bit client can be skipped.
·         While installing client, 32 bit DB client is first installed followed by 64 bit client installation.

Database Privileges

The following privileges must be granted to the owners of the database schemas:
l CREATE SESSION
l CREATE VIEW
l CREATE TYPE
l CREATE TABLE
l CREATE CLUSTER
l CREATE TRIGGER
l CREATE SEQUENCE
l CREATE INDEXTYPE
l CREATE PROCEDURE
l CREATE ANY SYNONYM
l DROP ANY SYNONYM
l UNLIMITED TABLESPACE

Enabling Statement Caching for Financial Management

If you use Oracle Database Client 10.2.x or 11.1.x for Financial Management, you must set the StmtCacheSize registry setting for Oracle OLE DB to 10 on all Financial Management application servers. This is due to a memory issue in Oracle Provider for OLE DB.


Preparing Web Application Server

Oracle provides a limited-use license of WebLogic Server for use with EPM System products. IF we are using the weblogic server which comes by default with EPM system installers, we need not to take any action for web application server.
The Middleware directory of web server should be similar to EPM System Middleware directory.

Preparing Web Server

We can deploy Hyperion EPM applications on list of supported web servers.

Oracle HTTP server

It is installed automatically during EPM installation.

Microsoft Internet Information Services (IIS)

To verify the IIS installation, ensure that the IIS services are running:
·         IIS Admin Service
·         World Wide Web Publishing Service

Preparing Web Browsers


Disk Space and RAM

While installation, the installer checks for twice the disk space required as per following table.