Oracle Hyerion Financial Management Copy Utility
The copy utility is useful when we need to copy a single
application either entirely or just a portion between environments such as
between Production and Test, QA or Development
Source Environment = Environment from which we want to
copy application
Target Environment = Environment on which we want to copy
application.
HFM Copy utility should be run either from HFM server
either in Source Environment or in Target Environment.
In
current project, I have downloaded HFM Application copy utility bundled with
Hyperion EPM Suite V11.1.2.3.501 and I am using it with Hyperion EPM Suite
V11.1.2.1 as recommended by Oracle.
The copy
utility from a newer Financial Management release is backwards compatible to as
far back as version 9.2. It is typically recommended to use the most current
commercial release of the utility to take advantage of fixes and new features.
Create UDL
On the HFM server from which, we are going to run copy
utility function, we need to create two UDL files.
1. Source
UDL file – To establish connection with DB used in Source environment.
2. Target
UDL file – To establish connection with DB used in Target environment.
These UDL files should use DB schema specified for HFM in
environment.
Source UDL
On the HFM server , create a new test document.
Save the text document as “Source.udl”
So, we will be able to see Source UDL file as shown
below.
Target UDL file
Repeat the same process as mentioned for Source UDL for “Target.udl”
Running Copy Utility
The Financial Management Application Copy Utility is
installed on the Financial Management Application server by default.
Location = EPM_ORACLE_HOME \Products\ FinancialManagement
\Utilities
Filename on 32-bit = HfmCopyApplication.exe
Filename on 64-bit = HfmCopyApplication_x64.exe
From
the above location, run copy utility as an administrator
Starting with 11.1.2.2.302, you now have the option to
copy an application or to rename the application in-place. Note that the
renamed application must be registered to Shared Services, just like a copied application,
before it can be accessed.
Source Database Connection
Starting with 11.1.2.2.302, you have 3 options to connect
to the data source:
·
Use Pre-configured HFM database connection:
The utility reads the HFM database connection details from HIT for the Source
connection. This option is available only when HIT configuration has been
detected.
·
Use UDL File: Select the >> button
to navigate to the proper UDL file for the Source environment. UDL must be
manually created.
·
Enter Connection Information: UI allows
you to manually enter connection details.
Source Application
The list of applications is retrieved from the
Hsx_DataSources table in the Source environment.
Target Database Connection
Starting with 11.1.2.2.302, you have 3 options to connect
to the data source:
·
Use Pre-configured HFM database connection:
The utility reads the HFM database connection details from HIT for the Source
connection. This option is available only when HIT configuration has been
detected.
·
Use UDL File: Select the >> button
to navigate to the proper UDL file for the Source environment. UDL must be
manually created.
·
Enter Connection Information: UI allows
you to manually enter connection details.
Target Application
For the Target destination, the utility will read the
Windows registry and populate the drop down with the names of applications that
were previously copied. If this is the first time running the utility then it will
show only the Source application name. The registry key read is user specific,
HKEY_CURRENT_USER\Software\Hyperion Solutions\HfmCopyApplication\Settings or
HKEY_CURRENT_USER\Software\Hyperion Solutions\HfmCopyApplication_x64\Settings,
and the values read to populate the drop down are
DestApp00 – DestAppXX. You may select an existing application name from the
drop down or manually type a new application name. The Target application name
must adhere to the naming convention as covered in the Financial Management
Administrators guide.
Advanced Options
Copy Application Data: This box is typically
checked to generate an identical copy of the Source application. Clear this
check box to create a “shell” application. Application metadata tables will be
copied and populated while data tables are only created but are not populated.
Copy Audit data: This box can be cleared if Task
and Data audit trails are not required to be maintained in the Target
environment. Often the Task and Data audit tables are very large tables and
should not be copied unless required.
Copy Cluster Settings: This check box should
normally not be checked. This will copy the Financial Management Cluster
related tables only if the Source environment has a cluster defined. Copying
this information between Production and Test can cause cross over connections
where Test environments connecting to a cluster actually connect to the
Production application servers.
Overwrite existing Application (if it exists): In
general always select “Drop All Application tables prior to copy”. It is
possible for the Target application to have Scenario and Year data populated
that the Source application does not have and not dropping these tables would
introduce variances in the newly copied application compared to the Source
application. The circumstances in which “Only drop tables that are being
copied” would be a valid option would be rare.
*Note that the HFM_Errorlog table is not copied by this
utility regardless of the options selected.
Advanced Options
The Advanced Options dialog is broken up in to three
pages. It would typically not be required to make any changes to any selections
on these tabs unless directed by Support to address a specific situation.
Use Client-Side Cursors: This option will bring
all row data to the client from the RDBMS server. The server will cache no
data. All caching will occur on the client, meaning the client will require more
memory and the server will require less memory. Reduce the number of threads to
2 x Number of CPUs if this option is selected. Use this option if Server-Side
cursors fail.
Use Server-Side Cursors: This option will run
faster and require less memory on the client. The data set will be cached on
the server (requiring more resources on the server). This is the default
option.
SQL Binding: This option specifies how the SQL
statement is executed on the server. The default is to use SQL binding. Change
this option to not use SQL binding if excessive errors occur or “Multi-Step OLE
DB Errors” occur. It is best to leave this option on and then restart any
failed processes with this option disabled (if the error is a “Multi-Step…”
error).
Thread Usage: This option allows the user to
specify the number of processing threads. The minimum is one and the maximum is
twenty. This option basically controls how many current tables are being
processed and has an impact on the amount of network traffic and the load
placed on Source and Target RDBMS servers.
Log SQL Errors: This option specifies whether to
output every SQL error to the log file. Please note, some errors are expected.
You may see errors for the attempt to drop tables that do not exist or the
defaulting of sequence values. This is acceptable. Do not use the presence of
SQL errors in the log to gauge whether the processing succeeded. This option is
not checked by default to reduce confusion when reviewing the log.
Number of Task retries: This option specifies the
number of times a query should be re-executed in the event of a failure. This
is to resolve possible deadlock issues when inserting data in the database.
Data Options
The Data Options tab allows you to control what data is
actually copied. The Copy Application Data check box must be checked on the
Options screen before any data will be copied. The screen shot below shows
non-default selections where the utility would only copy data in years 2006 and
2007 for the Actual Scenario:
Year Options
Limit Data to one or more Years: Select this
option when you need to copy a subset of historical data. Be careful to
consider the impact Rules may have when previous Year data is not copied.
Scenario Options
Limit data to one or more Scenarios: Select this
option to copy only a subset of the overall application. Be care to consider
the impact Rules may have when Scenarios are not copied
Data Options
Do not export Numeric Data: When this option is
selected the numeric data is not copied but cell text and line item detail
information is copied.
Do not export User data (grids, forms, reports, etc):
This is information maintained in the USERPARAMS.
Invalid Records Options
Note the warning that these options will impact
performance and require more database sort area. The utility does a join on the
DCN and DCE tables with the metadata ITEM tables.
Filter invalid Calc Status Records: Invalid
Calc status records are the result of Meta Data changes. This option selects
only the rows for which the entity and value exist in the database.
Filter invalid Data Records: Invalid Data
status records are the result of Meta Data changes. This option selects only
the rows where the entity, account, ICP, custom1-4 exist.
Filter Zero value data records: Zeros in the
application can impact application performance. The utility does not copy rows
found to have zeros for all periods.
DataBase Options
The Database Options tab allows for control over where
the data is stored in the database. Multiple tablespaces can be configured
based on database table types.
Data Table: consist of all Scenario/Year tables
(DCN, DCE, CSN, CSE, LID, TXT, RTD, etc). These tables are generally written to
and read from quite frequently. They generally have large amounts of relatively
small rows.
Metadata Tables: consist of all of the metadata
based tables (DESC, LAYOUT, HEADER, ITEM). These tables are read from and
written to fairly infrequently. They have small numbers of small rows.
System Tables: are read from rather frequently
(HSV, HSX, HFM). Excluding the HFM_ERRORLOG table (which is not read or written
to by the Copy App utility) these tables have small row counts.
Audit Tables: generally have large numbers of rows
of medium sized data. They are written to rather frequently and read from infrequently.
BLOB Tables: (the current option shows LOB tables
but will be changed to read BLOB in the next release) have BLOB columns that
are broken up to 2Kb chunks. These tables are read from more frequently than
written to.
Data Tablespace: Allows you to control where data
objects are created by copy utility. Change from <Default> is only needed
in environments where DBA wants to separate data and index objects. Note that
the HFM application server(s) should also be configure to use the same
tablespace options so new tables are created in the expected location.
When the Target database is MS
SQL Server, you will see all File groups configured for the specific database
configured in the Target UDL. When the Target database is Oracle, you will see
a list of all tablespaces that the user has quota to create objects.
Index Tablespace: Allows you to control where
index objects are created by copy utility. Change from <Default> is only
needed in environments where DBA wants to separate data and index objects. Note
that the HFM application server(s) should also be configured to use the same
tablespace options so new indexes are created in the expected location. When
the Target database is MS SQL Server, you will see all File groups configured
for the specific database configured in the Target UDL. When the Target
database is Oracle, you will see a list of all tablespaces that the user has
quota to create objects.
Confirmation Screen
This screen allows you to verify all settings before
selecting “Next” to start the copy process.
Copying
The processing status screen displays the current status
of each task. To see the log entries for any given task at any time during
processing, simply double-click on the task row to display the Task Entry Log
screen.
Note that when the Source and Target are the same
database and the same schema (user) the utility does not process each table row
by row, instead an INSERT INTO…SELECT FROM statement is used. As a result of
this, the utility will not display a row count showing the number of rows that
have been processed but the log still will show the number of rows copied.
Task Entry Log Screen
Completed Tasks
Failed Tasks
To see the log entries for any task, running or
completed, double click on the entry in the Task Status window. If the Display
SQL Errors option has been selected, the error generated by the RDBMS will also
be displayed in the log.
If the Task Entry Log screen is displayed after all
processing has completed, you will have the option of restarting the task.
Restart Task
Once all processing has completed, you can go to any task
in the list, double-click on the entry and activate the Restart Task page. From
this page you can change task options and select the Restart Task button. The
task will then be re-executed with the new options (if any). The task entry in
the Processing Status screen will be updated with current Task progress.
Finished Screen
If all tables have successfully copied then select “OK”
to see the Finish screen.
From the Finished screen, you can review the log file.
Copy Utility Log
Log for copy utility is located at MIDDLEWARE_HOME\EPMSystem11R1\logs\hfm\HFMCopyAppCmdLog.logThe
log is saved as HFMCopyApp-MMDDYYYYHHMMSS.log where MMDDYYYYHHMMSS is based on
the Date and time the original file was created.
Sample log file appears as below
The next step in log is initialization.
One step in the initialization is the creation of 2 cache
tables in the Source environment named HFMCAU_COLUMN_INFO and HFMCAU_INDEX_INFO.
These 2 tables contain the table and index Data Definition Language (DDL) to
use when creating the new tables in the Target environment. The cache tables
are dropped when the copy utility successfully completes. An error in the
initializing section related to these 2 cache tables usually either means the
RDBMS user in the Source UDL file does not have the rights to create tables or
that these 2 cache tables already exist but were created from an older version
of the utility. DBA can check and drop these 2 tables if they are found to
exist when the copy utility is not running. The information contained in these
2 tables allows the utility to create the Target tables faster as the DDL can
be retrieved faster from the tables rather than generating the DDL one table at
a time while the utility is running. If the cache tables are not able to be
created for any reason the Target application can still be successfully copied.
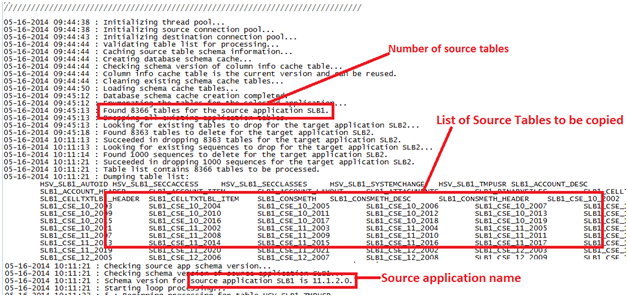
Next is an example of an error caused when a newer
version of the copy utility tries to update preexisting cache tables left over
from a failed copy attempt started from an older utility version. Manually
dropping these 2 tables prevents the error from happening the next time the utility
is run:
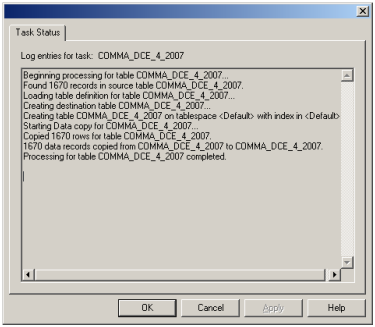
The next portion in log file shows entries for one table
are successfully copied.


 The optimum clustering ratio value is 1. If average
clustering ratio is less than 1, then the cube is fragmented which affects
performance and needs to be defragmented.
The optimum clustering ratio value is 1. If average
clustering ratio is less than 1, then the cube is fragmented which affects
performance and needs to be defragmented. The above screenshot is taken from my current project - Test Environment.

 Check if the data load to the cube is successful.