
Monday, August 18, 2014

Wednesday, July 23, 2014
Invalid Records in HFM
Invalid Records
There are two types of invalid records in Oracle HFM.
- Invalid Metadata Members
- Invalid Intersections
Let us understand these records one by one.
1. Invalid Metadata Members
These are members that existed at some point and were populated
with data. Renaming or deleting these members orphans the data in the database.
E.g. Suppose we
have entity called “FRANCE – 08980” in
our HFM application SMBAPP.
When we create this entity , from HFM we can see Alias
FRANCE and entity – 08980 either from HFM client, or webform or grid or
smartview.
But behind HFM, in Oracle RDBMS, FRANCE is given an ID of
12 (Let’s assume) as it was 12th entity created. We can find the
field when we look at the tables and locate the EntityID field. All the data
loaded will be broken out by record and given an EntityID of 12
Suppose , we are not using this entity “FRANCE” anymore.
When we delete the entity “FRANCE – 08980”, the only thing removed is the
association between France and 10. The data records remain.
This is to make the speed of the metadata loads
acceptable. Running all the possible validations could really slow the loads
down. Over time, as metadata is changed, some of the existing records in the
database will become invalid.
This type of invalid record can be deleted safely by
using Delete Invalid Records.
2. Invalid Intersections
This type is created when there was a relationship
between the metadata members that was valid and is no longer. The members are
still valid in the application, but the relationship where the data is
populated is no longer valid.
Most commonly it is when there are changes to the
CustomXTopMember relationship. This type of invalid data is not currently removed by any HFM
functionality. The only way to resolve this issue is to rebuild the
application.
Rebuilding the application as an option is not appealing.
The best option is to be aware of this, and clear your data before you
make the metadata changes.
We might wonder why Oracle did not put this validation of
invalid records check during loading metadata.
The reality is
that validating every possible intersection is not reasonable. There is a big
impact to metadata loading when the existing validations run.
We can see the impact when you try to load a file that has many errors or validation checks.
Because of this impact, one validation in particular is excluded when metadata is loaded into HFM. It is the validation to check for invalid records.
We can see the impact when you try to load a file that has many errors or validation checks.
Because of this impact, one validation in particular is excluded when metadata is loaded into HFM. It is the validation to check for invalid records.
Oracle recommendation for deleting invalid records
It is recommended by Oracle that customers delete invalid
records every couple of months, especially after significant changes to
metadata. While doing this task is relatively safe for the database, if we have
never done it, or it has been a while since you’ve done it, it can take a long
time to complete. So be sure to do this during a down time for the application
and never during the close.
Procedure to delete invalid records
1.
Open Hyerion Worksace
2.
Open the application from which to delete
invalid records.
3.
Select Tasks -- > Data Management
4.
From the Manage Data page, expand Clear Invalid
Records.
5.
Perform a task:
a. Click
Scan to scan for invalid records.
b. Click
Clear Invalid Records to clear the records.

Invalid records
can also be deleted while copying application by selecting Advanced Options tab
in copy utility.
Monday, July 21, 2014
Oracle Hyerion Financial Management Copy Utility
Oracle Hyerion Financial Management Copy Utility
The copy utility is useful when we need to copy a single
application either entirely or just a portion between environments such as
between Production and Test, QA or Development
Source Environment = Environment from which we want to
copy application
Target Environment = Environment on which we want to copy
application.
HFM Copy utility should be run either from HFM server
either in Source Environment or in Target Environment.
In
current project, I have downloaded HFM Application copy utility bundled with
Hyperion EPM Suite V11.1.2.3.501 and I am using it with Hyperion EPM Suite
V11.1.2.1 as recommended by Oracle.
The copy
utility from a newer Financial Management release is backwards compatible to as
far back as version 9.2. It is typically recommended to use the most current
commercial release of the utility to take advantage of fixes and new features.
Create UDL
On the HFM server from which, we are going to run copy
utility function, we need to create two UDL files.
1. Source
UDL file – To establish connection with DB used in Source environment.
2. Target
UDL file – To establish connection with DB used in Target environment.
These UDL files should use DB schema specified for HFM in
environment.
Source UDL
On the HFM server , create a new test document.


Target UDL file
Repeat the same process as mentioned for Source UDL for “Target.udl”
Running Copy Utility
The Financial Management Application Copy Utility is
installed on the Financial Management Application server by default.
Location = EPM_ORACLE_HOME \Products\ FinancialManagement
\Utilities
Filename on 32-bit = HfmCopyApplication.exe
Filename on 64-bit = HfmCopyApplication_x64.exe
From
the above location, run copy utility as an administrator


Source Database Connection
Starting with 11.1.2.2.302, you have 3 options to connect
to the data source:
·
Use Pre-configured HFM database connection:
The utility reads the HFM database connection details from HIT for the Source
connection. This option is available only when HIT configuration has been
detected.
·
Use UDL File: Select the >> button
to navigate to the proper UDL file for the Source environment. UDL must be
manually created.
·
Enter Connection Information: UI allows
you to manually enter connection details.

Source Application
The list of applications is retrieved from the
Hsx_DataSources table in the Source environment.

Target Database Connection
Starting with 11.1.2.2.302, you have 3 options to connect
to the data source:
·
Use Pre-configured HFM database connection:
The utility reads the HFM database connection details from HIT for the Source
connection. This option is available only when HIT configuration has been
detected.
·
Use UDL File: Select the >> button
to navigate to the proper UDL file for the Source environment. UDL must be
manually created.
·
Enter Connection Information: UI allows
you to manually enter connection details.

Target Application
For the Target destination, the utility will read the
Windows registry and populate the drop down with the names of applications that
were previously copied. If this is the first time running the utility then it will
show only the Source application name. The registry key read is user specific,
HKEY_CURRENT_USER\Software\Hyperion Solutions\HfmCopyApplication\Settings or
HKEY_CURRENT_USER\Software\Hyperion Solutions\HfmCopyApplication_x64\Settings,
and the values read to populate the drop down are
DestApp00 – DestAppXX. You may select an existing application name from the
drop down or manually type a new application name. The Target application name
must adhere to the naming convention as covered in the Financial Management
Administrators guide.

Advanced Options

Copy Audit data: This box can be cleared if Task
and Data audit trails are not required to be maintained in the Target
environment. Often the Task and Data audit tables are very large tables and
should not be copied unless required.
Copy Cluster Settings: This check box should
normally not be checked. This will copy the Financial Management Cluster
related tables only if the Source environment has a cluster defined. Copying
this information between Production and Test can cause cross over connections
where Test environments connecting to a cluster actually connect to the
Production application servers.
Overwrite existing Application (if it exists): In
general always select “Drop All Application tables prior to copy”. It is
possible for the Target application to have Scenario and Year data populated
that the Source application does not have and not dropping these tables would
introduce variances in the newly copied application compared to the Source
application. The circumstances in which “Only drop tables that are being
copied” would be a valid option would be rare.
*Note that the HFM_Errorlog table is not copied by this
utility regardless of the options selected.
Advanced Options
The Advanced Options dialog is broken up in to three
pages. It would typically not be required to make any changes to any selections
on these tabs unless directed by Support to address a specific situation.

Use Server-Side Cursors: This option will run
faster and require less memory on the client. The data set will be cached on
the server (requiring more resources on the server). This is the default
option.
SQL Binding: This option specifies how the SQL
statement is executed on the server. The default is to use SQL binding. Change
this option to not use SQL binding if excessive errors occur or “Multi-Step OLE
DB Errors” occur. It is best to leave this option on and then restart any
failed processes with this option disabled (if the error is a “Multi-Step…”
error).
Thread Usage: This option allows the user to
specify the number of processing threads. The minimum is one and the maximum is
twenty. This option basically controls how many current tables are being
processed and has an impact on the amount of network traffic and the load
placed on Source and Target RDBMS servers.
Log SQL Errors: This option specifies whether to
output every SQL error to the log file. Please note, some errors are expected.
You may see errors for the attempt to drop tables that do not exist or the
defaulting of sequence values. This is acceptable. Do not use the presence of
SQL errors in the log to gauge whether the processing succeeded. This option is
not checked by default to reduce confusion when reviewing the log.
Number of Task retries: This option specifies the
number of times a query should be re-executed in the event of a failure. This
is to resolve possible deadlock issues when inserting data in the database.
Data Options
The Data Options tab allows you to control what data is
actually copied. The Copy Application Data check box must be checked on the
Options screen before any data will be copied. The screen shot below shows
non-default selections where the utility would only copy data in years 2006 and
2007 for the Actual Scenario:

Year Options
Limit Data to one or more Years: Select this
option when you need to copy a subset of historical data. Be careful to
consider the impact Rules may have when previous Year data is not copied.
Scenario Options
Limit data to one or more Scenarios: Select this
option to copy only a subset of the overall application. Be care to consider
the impact Rules may have when Scenarios are not copied
Data Options
Do not export Numeric Data: When this option is
selected the numeric data is not copied but cell text and line item detail
information is copied.
Do not export User data (grids, forms, reports, etc):
This is information maintained in the USERPARAMS.
Invalid Records Options
Note the warning that these options will impact
performance and require more database sort area. The utility does a join on the
DCN and DCE tables with the metadata ITEM tables.
Filter invalid Calc Status Records: Invalid
Calc status records are the result of Meta Data changes. This option selects
only the rows for which the entity and value exist in the database.
Filter invalid Data Records: Invalid Data
status records are the result of Meta Data changes. This option selects only
the rows where the entity, account, ICP, custom1-4 exist.
Filter Zero value data records: Zeros in the
application can impact application performance. The utility does not copy rows
found to have zeros for all periods.
DataBase Options
The Database Options tab allows for control over where
the data is stored in the database. Multiple tablespaces can be configured
based on database table types.

Data Table: consist of all Scenario/Year tables
(DCN, DCE, CSN, CSE, LID, TXT, RTD, etc). These tables are generally written to
and read from quite frequently. They generally have large amounts of relatively
small rows.
Metadata Tables: consist of all of the metadata
based tables (DESC, LAYOUT, HEADER, ITEM). These tables are read from and
written to fairly infrequently. They have small numbers of small rows.
System Tables: are read from rather frequently
(HSV, HSX, HFM). Excluding the HFM_ERRORLOG table (which is not read or written
to by the Copy App utility) these tables have small row counts.
Audit Tables: generally have large numbers of rows
of medium sized data. They are written to rather frequently and read from infrequently.
BLOB Tables: (the current option shows LOB tables
but will be changed to read BLOB in the next release) have BLOB columns that
are broken up to 2Kb chunks. These tables are read from more frequently than
written to.
Data Tablespace: Allows you to control where data
objects are created by copy utility. Change from <Default> is only needed
in environments where DBA wants to separate data and index objects. Note that
the HFM application server(s) should also be configure to use the same
tablespace options so new tables are created in the expected location.
When the Target database is MS
SQL Server, you will see all File groups configured for the specific database
configured in the Target UDL. When the Target database is Oracle, you will see
a list of all tablespaces that the user has quota to create objects.
Index Tablespace: Allows you to control where
index objects are created by copy utility. Change from <Default> is only
needed in environments where DBA wants to separate data and index objects. Note
that the HFM application server(s) should also be configured to use the same
tablespace options so new indexes are created in the expected location. When
the Target database is MS SQL Server, you will see all File groups configured
for the specific database configured in the Target UDL. When the Target
database is Oracle, you will see a list of all tablespaces that the user has
quota to create objects.
Confirmation Screen
This screen allows you to verify all settings before
selecting “Next” to start the copy process.

Copying

Note that when the Source and Target are the same
database and the same schema (user) the utility does not process each table row
by row, instead an INSERT INTO…SELECT FROM statement is used. As a result of
this, the utility will not display a row count showing the number of rows that
have been processed but the log still will show the number of rows copied.
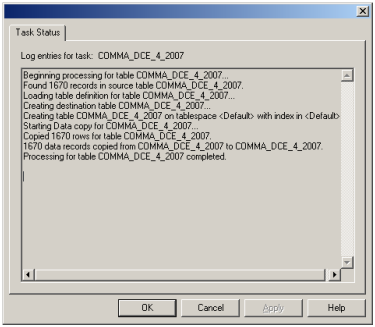
Task Entry Log Screen
Completed Tasks
Failed Tasks

If the Task Entry Log screen is displayed after all
processing has completed, you will have the option of restarting the task.
Restart Task

Once all processing has completed, you can go to any task
in the list, double-click on the entry and activate the Restart Task page. From
this page you can change task options and select the Restart Task button. The
task will then be re-executed with the new options (if any). The task entry in
the Processing Status screen will be updated with current Task progress.
Finished Screen


Copy Utility Log
Log for copy utility is located at MIDDLEWARE_HOME\EPMSystem11R1\logs\hfm\HFMCopyAppCmdLog.logThe
log is saved as HFMCopyApp-MMDDYYYYHHMMSS.log where MMDDYYYYHHMMSS is based on
the Date and time the original file was created.
Sample log file appears as below

The next step in log is initialization.
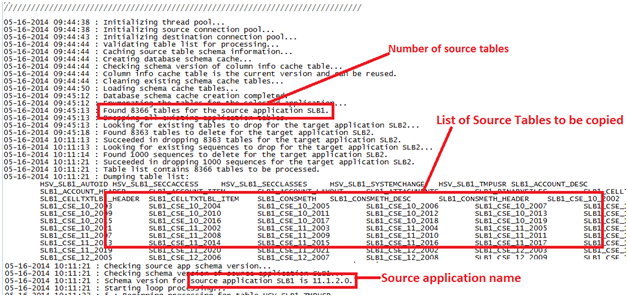
One step in the initialization is the creation of 2 cache
tables in the Source environment named HFMCAU_COLUMN_INFO and HFMCAU_INDEX_INFO.
These 2 tables contain the table and index Data Definition Language (DDL) to
use when creating the new tables in the Target environment. The cache tables
are dropped when the copy utility successfully completes. An error in the
initializing section related to these 2 cache tables usually either means the
RDBMS user in the Source UDL file does not have the rights to create tables or
that these 2 cache tables already exist but were created from an older version
of the utility. DBA can check and drop these 2 tables if they are found to
exist when the copy utility is not running. The information contained in these
2 tables allows the utility to create the Target tables faster as the DDL can
be retrieved faster from the tables rather than generating the DDL one table at
a time while the utility is running. If the cache tables are not able to be
created for any reason the Target application can still be successfully copied.
Next is an example of an error caused when a newer
version of the copy utility tries to update preexisting cache tables left over
from a failed copy attempt started from an older utility version. Manually
dropping these 2 tables prevents the error from happening the next time the utility
is run:

The next portion in log file shows entries for one table
are successfully copied.

Wednesday, March 5, 2014
Diagnostic Errors in Hyperion EPM V11.1.2.2
Last few hours, I was struggling hard with our
distributed Development environment of Hyperion EPM V11.1.2.2.
Sometimes, workspace was opening and I was not able to
open any of HFM applications. I was getting some error.

To get clear idea, I generated diagnostic report.
Middleware_HOME\user_projects\epmsystem1\bin\validate.bat.
The diagnostic report was full of RED rows :-( 
All these errors were related to WEB-Libraries. I re-deployed HFM as well as Foundation and
re-generated diagnostic report. But no success :-(
Finally got a proper solution.
This issue is identified as a software defect and logged
as BUG 14343719 in version 11.1.2.2.
Workaround:
1. Stop
all the Hyperion services.
2. Go
to Foundation server and navigate to the location
MIDDLEWARE_HOME\oracle_common\common\templates\applications
3. Move
the 'oracle.bicomposer.slib_template_11.1.1.jar' file from
MIDDLEWARE_HOME\oracle_common\common\templates\applications
to
MIDDLEWARE_HOME\oracle_common\common\templates\
4. Restart
the services
Note: Do not re-deploy.
Afterwards, when diagnostic report is generated, it was
all green and successful.

Cheers :-) Evolve With Hyperion :-)
Friday, January 17, 2014
Active Directory configuration in Hyperion EPM V11.1.2.2
Background
As of now, we are using default directory for authorizing
users for Hyperion EPM System in Vodafone.
Default directory is native directory - refers to the
Lightweight Directory Access Protocol (LDAP)-enabled user directory that Shared
Services uses to support provisioning.
What is User Directory
User directories refer to any corporate user and identity
management system compatible with Shared Services.
Supported User
directories
·
OID
·
Sun Java System Directory Server (formerly
SunONE Directory Server)
·
Microsoft Active Directory
·
custom-built user directories that implement
LDAP version 3
·
Windows NT LAN Manager (NTLM)
·
SAP native repository
We can configure one or more user directories along with
native directory in shared services for EPM System.
User Directory functions:
·
Used to
maintain and manage the default Shared Services user accounts required by EPM
System products
·
Central
storage for all EPM System provisioning information because it stores the
relationships among users, groups, and roles
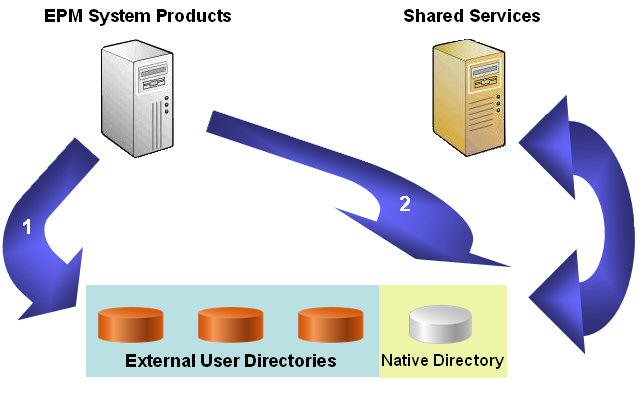
Single Sign On
(SSO) for EPM system using User Directory
·
Through a browser, users access the EPM System product
login screen and enter user names and passwords.
·
The Security API implemented on the EPM System
product queries the configured user directories (including Native Directory) to
verify user credentials. A search order establishes the search sequence. Upon
finding a matching user account in a user directory, the search is terminated,
and the user's information is returned to the EPM System product.
·
Access is denied if a user account is not found
in any user directory.
Configuring MSAD
Open shared services console
Administration à
Configure User directory


1. MSAD Connection information

·
Directory
server – populated automatically depending upon the user directory selected
for configuration. As we selected, MSAD, Microsoft is populated here.
·
Name
– It is for our reference. We can give any name here.
·
DNS
Lookup and Host Name –
o DNS Lookup – When HA is implemented, we can use this
option. IF the main MSAD server fails,
we can switch to the backup server which is registered to the same DNS name.
o Host
Name – This option is used when HA is not implemented. When user enters
credentials in EPM system, the user is searched in MSAD server which is located
with the host name given.
As HA is not implemented in our
case, we should be using Host Name.
·
Port –
User Directory port (389 is for MSAD)
·
Base DN
– The distinguished name (DN) of the node where the search for users and groups
should begin. Without filling anything, click “Fetch DNs” button and then
select one of the listed DNs
·
ID
Attribute – This attribute must be a common attribute that exists in user
and group objects on the directory server.
The recommended value of this attribute is automatically set for OID orclguid, SunONE (nsuniqueid), IBM Directory Server (Ibm-entryUuid), Novell eDirectory (GUID), and Active Directory (ObjectGUID).
The recommended value of this attribute is automatically set for OID orclguid, SunONE (nsuniqueid), IBM Directory Server (Ibm-entryUuid), Novell eDirectory (GUID), and Active Directory (ObjectGUID).
·
Maximum
size – it sets the limit on number of maximum users retrieved during
search. We have set this limit as 500 as
retrieving all users from domain takes huge time.
·
Trusted –
if it is trusted SSO source.
·
Anonymous bind – ignore this
right now. (To give search permission to particular users
·
User DN – This is the distinguished name of user
that will be used by Shared Services to configure.
To get DN, we can search it in
registry after logging into domain with same user credential.

We did not go for advanced options this time and can be
covered later.
2.
MSAD User
Configuration
Data entry in this user configuration screen is optional.
If we do not enter any user information here, Shared Services searches for all
users present in Base DN.
As we think, this will definitely affect the performance.
But we are going to manage performance by restricting user search to 500 in
first step and then configuring with a particular group instead of the whole
base DN.
So, we just kept the user configuration screen blank and
moved ahead.
3.
MSAD Group
Configuration

The final step is MSAD group configuration.
Here, in the unique identifier box, enter correct name of
group in domain and press auto configure. This will populate your group RDN.
In the second box,
Name Attribute – we have filtered user Admin from MSAD
directory. Admin user will be used only
from native directory. We were getting following error before trying this
option.
2014-01-14 10:50:59,295 ERROR [[ACTIVE] ExecuteThread:
'1' for queue: 'weblogic.kernel.Default (self-tuning)']
com.hyperion.css.spi.impl.msad.MSADProvider.authenticate(Unknown Source) --
60:1005:Authentication failed for user admin. Enter valid credentials.
In the last box, we have limited domain users only to
specific group. You can create a particular group for Hyperion users in domain
and provide the group name here so that the performance will be good.
Once we finish this step, we need to logoff from Shared
Services console.
Then we can see MSAD directory in the directory list in
Shared Services Console.

When logged off after MSAD configuration from shared services, I was not able to see the new directory under User directories.
*****************************************************************************
We need to restart foundation services service i.e. HyS9FoundationServices - Hyperion Foundation Services - Managed Server from services.
This showed the new added directory under user directories
******************************************************************************
Wednesday, January 15, 2014
Uninstalling Hyperion EPM V11.1.2.2
All Hyperion folks know it clearly that dealing with Hyperion
setup will require knowledge about uninstalling Hyperion suite
completely.
As it is pending from a long time, here are basic steps to follow to uninstall Hyperion EPM V11.1.2.2.
Uninstall using same admin credentials with which we have installed Hyperion EPM V11.1.2.2
Thus, it is very important to follow following steps before uninstalling EPM V11.1.2.2.
As it is pending from a long time, here are basic steps to follow to uninstall Hyperion EPM V11.1.2.2.
Uninstall using same admin credentials with which we have installed Hyperion EPM V11.1.2.2
Uninstall all related softwares
EPM uninstaller uninstalls JRE which comes with EPM installer. It is used for installation and configuration of any Hyperion products. The same JRE is used to uninstall related non-Hyperion softwares like weblogic, OHS. So, if we proceed for EPM V11.1.2.2 uninstall, we can not uninstall related softwares by proper procedure and so we might end up in option of deleting folders and cleaning related stuff.Thus, it is very important to follow following steps before uninstalling EPM V11.1.2.2.
- Run WL Uninstaller seperately
- Run OHS Uninstaller separately
- Run Oracle Application Developer uninstaller separately
Uninstall EPM System V11.1.2.2
- Stop all Hyperion and Oracle services
- Uninstall Hyperion EPM system by running "uninstall.bat" located at "MIDDLEWARE_HOME\EPMSystem11R1\uninstall"
- Once the uninstall is complete, the directory "MIDDLEWARE_HOME\EPMSystem11R1" should be removed.
Post Uninstallation tasks
Shortcuts should be removed.
Check from Start--> All Programs, all related shortcuts should have been removed.
Windows Registry
Check
under Windows registry in HKEY_LOCAL_MACHINE > Software and
HKEY_CURRENT_USER > Software whether the Brio > Hyperion >
Oracle keys have been removed correctly.

With Oracle keyword, there will be keys for Oracle client which is installed as pre-requisite of EPM System.
Environment Variables
Following
environment variables are created while installing hyperion EPM system
and should be removed after uninstalling EPM system.
- ARBORPATH
- EPM_ORACLE_HOME
- ESSBASEPATH
- HYPERION_HOME


PATH variable
Check the PATH variable and delete any portions that need to be removed.

Manual File Deletion
Manually check the file system to see if any files or folders have been left behind. If any of these are left behind, they need to be removed manually.- Ensure that <system drive>\Documents and Settings\<install_user>\.oracle.instance file has been deleted.
- Ensure that .oracle.products file in Middleware_Home\EPMSystem11R1 has been deleted.
- Remove any files left in the existing HYPERION_HOME if this location is to be re-used.
- Delete any BEA folder on the file system.
- Delete or rename installer records in C:\Program Files\common files\InstallShield\* if no other programs installed by this tool remain.
- Check for Oracle EPM related entries in the inventory.xml file located in C:\Program Files\Oracle\Inventory\ContentsXML and remove these entries from the file.

- Clean up any remaining Hyperion-related files and directories under the user's install home. E.g. "D:\Oracle\Middleware"
Registry keys deletion
Registry keys which should be deleted:
HKEY_LOCAL_MACHINE\software\wow6432node\oracle\
Delete any additional 'dds_proxy' settings in the registry.
Delete any additional 'arborpath' entries in the registry.
Delete any additional 'hyperion' entries in the registry.
HKEY_LOCAL_MACHINE\software\wow6432node\oracle\
Delete any additional 'dds_proxy' settings in the registry.
Delete any additional 'arborpath' entries in the registry.
Delete any additional 'hyperion' entries in the registry.
Reboot the system
Please reboot the server after all the steps in the uninstallation have been performed.
Subscribe to:
Posts (Atom)